

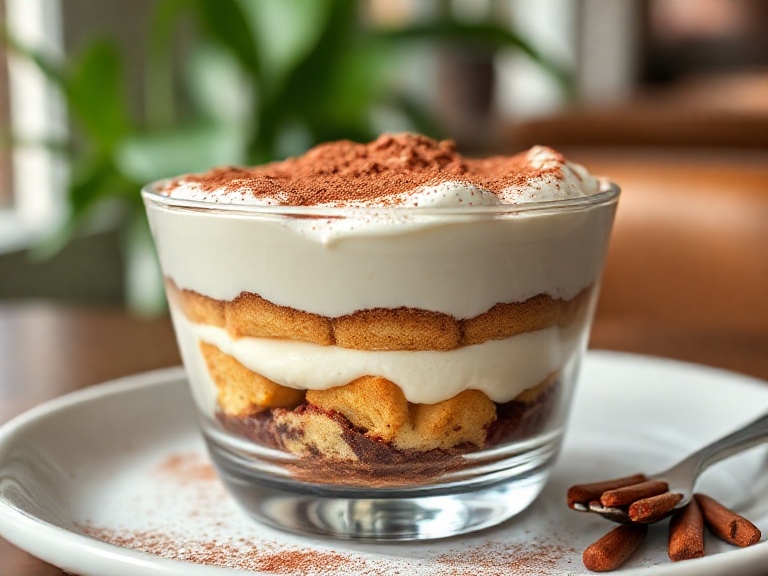
If you’re looking for a dessert that feels indulgent yet simple, this Easy Tiramisu Recipe is the perfect choice. Unlike complicated desserts that require baking or precise techniques, this Italian classic comes together with minimal effort and guarantees delicious results.
By layering coffee-soaked ladyfingers with a light and creamy mascarpone mixture, you’ll create a no-bake masterpiece that tastes as though it came straight from a café in Rome.
To make this tiramisu, start by whipping heavy cream with powdered sugar and vanilla until stiff peaks form. Fold in softened mascarpone gently to create a smooth, airy filling.
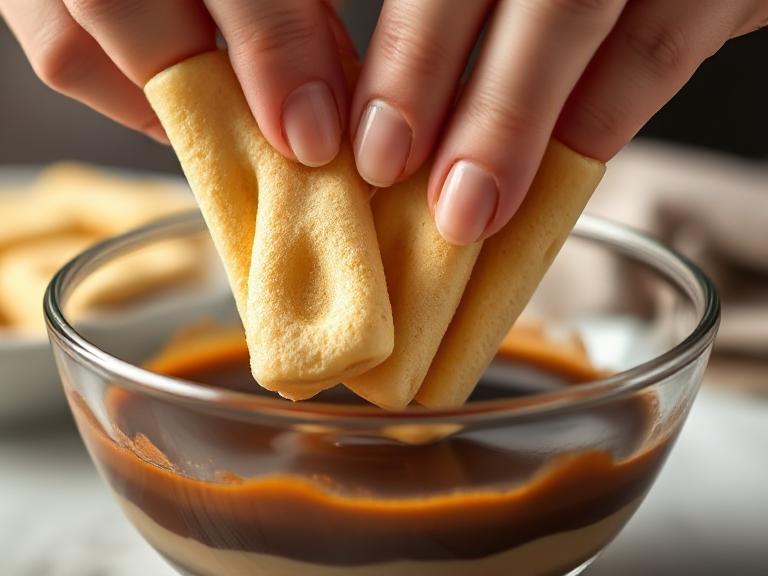
Quickly dip ladyfingers into cooled espresso or strong coffee just a second per side is enough to keep them moist without turning soggy. Arrange the first layer of ladyfingers in your dish, spread half the cream mixture on top, then repeat the process with a second layer. Finally, dust the top with unsweetened cocoa powder for that signature tiramisu finish.
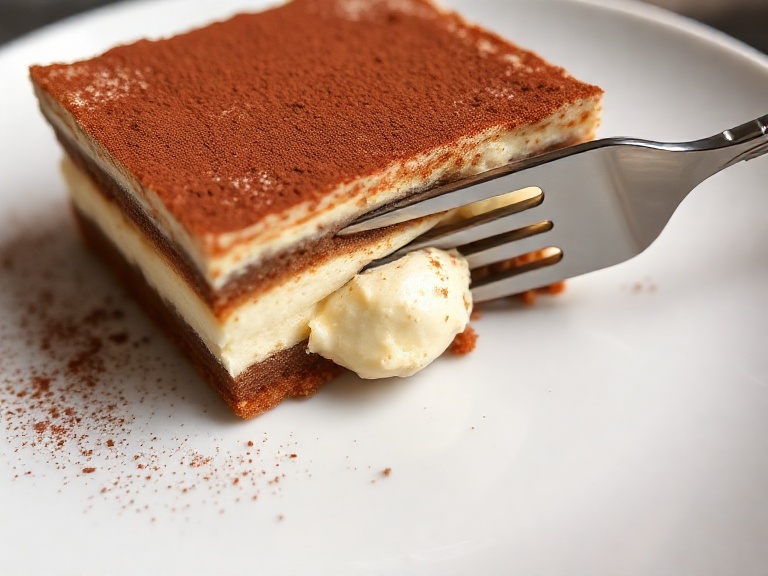
The secret to success lies in letting the dessert rest in the refrigerator for at least four hours, or ideally overnight, so the flavors meld beautifully. When it’s time to serve, slice neatly and garnish with chocolate shavings or fresh berries if desired.
This recipe is beginner-friendly, foolproof, and perfect for dinner parties, celebrations, or whenever you crave a sweet pick-me-up. For step-by-step guidance and all details, check the complete recipe in given below.
Why This No-Bake Tiramisu Recipe Works
This version of tiramisu eliminates complicated egg-based custards, making it:
- Beginner-friendly – minimal steps, no advanced baking skills.
- Quick – just 20 minutes of prep before chilling.
- Foolproof – whipped cream and mascarpone ensure a rich, stable filling.
- Make-ahead – actually tastes better when chilled overnight.
Step-by-step (long): Easy Tiramisu Recipe – No-Bake Dessert Anyone Can Master
Below is an expanded, highly detailed step-by-step guide to make a perfect Easy Tiramisu Recipe – No-Bake Dessert Anyone Can Master. I’ll walk you through every small technique, timing, and troubleshooting tip so your tiramisu is creamy, balanced, and beautifully layered.
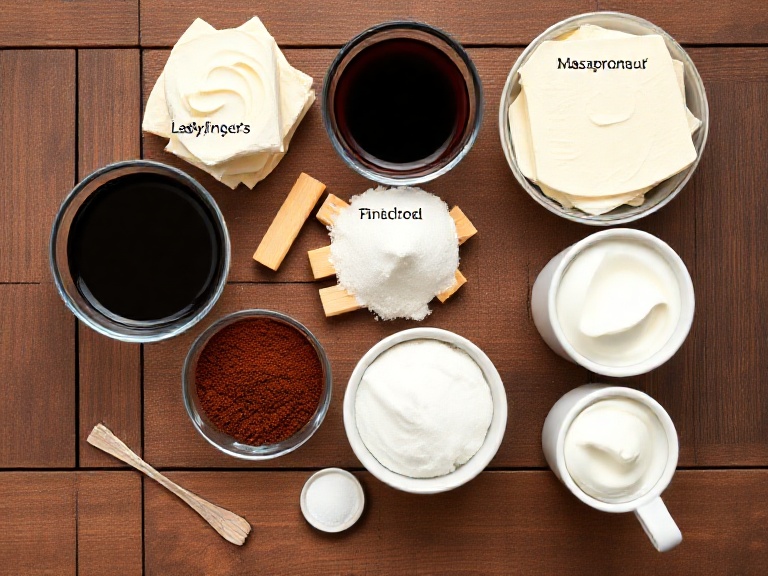
Ingredients (serves 8–10)
- Mascarpone cheese — 16 oz (450 g)
- Heavy whipping cream — 1½ cups (360 ml)
- Powdered (icing) sugar — ½ cup (60 g) — adjust to taste
- Pure vanilla extract — 1 tsp (5 ml)
- Espresso or very strong coffee — 1½ cups (360 ml), cooled
- Ladyfingers (savoiardi) — 24–30 pieces (depends on pan size)
- Coffee liqueur (optional) — 2–3 tbsp (30–45 ml) — Kahlúa, Marsala, or dark rum
- Unsweetened cocoa powder — 2–4 tbsp for dusting
- Dark chocolate (optional) — for shavings or curls as garnish
Equipment & prep checklist
- Large mixing bowl (metal is best for chilling).
- Electric hand mixer or stand mixer.
- Rubber spatula for gentle folding.
- Shallow bowl for dipping coffee.
- 9×13-inch (23×33 cm) baking dish OR 8×8 (20×20 cm) for a taller tiramisu.
- Fine mesh sieve for cocoa dusting.
- Instant-read thermometer (optional).
- Sharp knife and cutting board.
Prep (do this before starting the recipe):
- Place the mixing bowl and whisk/beaters in the freezer for 10–15 minutes. Cold tools help whipping the cream faster and more stably.
- Brew the espresso/strong coffee and let it cool to room temperature; once cool, transfer to a shallow dipping bowl and stir in liqueur if using. Chill in the fridge if still warm.
Step 1 — Chill & set up (10–20 minutes)
- Chill tools: As noted, keep your mixing bowl and whisk chilled. Cold tools = quicker, more stable whipped cream.
- Arrange your workspace: Place the coffee bowl, ladyfingers, mascarpone tub (at room temp), spatula, and dish within reach. Tiramisu assembly moves quickly once dipping starts.
- Open and lightly stir mascarpone: Gently stir the mascarpone with a spatula to loosen it. If refrigerated too long, let it sit 10–15 minutes so it becomes soft enough to fold easily (but not warm).
Why this matters: Cold tools + slightly softened mascarpone = smooth, lump-free cream.
Step 2 — Make the whipped cream base (7–10 minutes)
- Measure heavy cream into the chilled bowl.
- Add powdered sugar (start with ⅓ to ½ cup depending on sweetness preference) and vanilla extract.
- Whip on medium speed with your mixer.
- Soft peaks form first (the cream will hold but droop).
- Continue to stiff peaks — peaks should stand straight when the whisk is lifted. Aim for stiff but not grainy. This usually takes 3–5 minutes with an electric mixer.
- Check frequently — stop when peaks hold but the cream still looks glossy. Overwhipping turns cream grainy and eventually into butter.
Troubleshooting:
- If underwhipped, the mascarpone will sag the mixture. Whip a bit longer.
- If overwhipped, you may be able to rescue by folding in a splash more cold cream, but if it’s buttery, start fresh.
Step 3 — Fold mascarpone into whipped cream (3–5 minutes)
- Spoon the softened mascarpone into the whipped cream in 3 additions.
- Using a rubber spatula, fold gently—use big sweeping motions from the bottom up and around—so you keep airiness. Don’t stir vigorously.
- Mix until homogeneous and smooth. The texture should be light, billowy and slightly dense—not runny.
Pro tip: If mascarpone is lumpy, press it through a fine sieve into the cream or beat it separately for 20–30 seconds to smooth before folding.
Step 4 — Prepare coffee dipping station (2 minutes)
- Pour the cooled espresso/coffee into a wide shallow bowl.
- Taste the coffee; it should be strongly flavored but not bitter. Add 2–3 tbsp coffee liqueur if using.
- Rule of thumb for dipping: 1 second per side—quick dunk only. Over-soaking = soggy layers.
Step 5 — First ladyfinger layer (5–8 minutes)
- Quick dip each ladyfinger: submerge for 0.5–1 second per side. Ladyfingers soak up fast — don’t let them sit.
- Lay them in a single close row in the bottom of your dish (edge to edge). If pieces are too long, break them to fit.
- Cover the bottom completely — slight gaps are okay.
Hint: If you accidentally over-soak one, place it on a paper towel briefly to drain before adding.
Step 6 — First cream layer (2–3 minutes)
- Spoon half of the mascarpone-cream over the first layer of ladyfingers.
- Use a spatula to spread evenly to the edges — ⅓–½ inch thickness is typical.
- Smooth the top but avoid compressing the ladyfingers too much.
Step 7 — Repeat dipping and layering (5–8 minutes)
- Repeat Step 5 for a second layer of coffee-dipped ladyfingers.
- Spread the remaining mascarpone mixture evenly on top.
- Smooth the top carefully.
Option: For a three-layer tiramisu (taller), use an 8×8 pan and 1½x ingredients. Use 3 thin cream layers for extra height.
Step 8 — Final finish & dusting (2–3 minutes)
- Using a fine mesh sieve, dust a generous layer of unsweetened cocoa powder over the top.
- For a decorative touch, grate dark chocolate over half the dish or add chocolate curls.
- Cover with plastic wrap (ensure it doesn’t touch cocoa surface) and refrigerate.
Step 9 — Chill time (minimum 4 hours; best overnight)
- Minimum: 4 hours for flavors to meld and ladyfingers to soften just right.
- Optimal: Overnight (~8–12 hours). This produces the best texture and flavor depth.
- If short on time, chill 4 hours and still get a tasty result, but overnight is recommended.
Step 10 — Serving (5–10 minutes)
- Remove from the fridge 10–15 minutes before serving to soften slightly for easier slicing.
- Use a sharp knife warmed in hot water and wiped dry between cuts for neat slices.
- Serve on chilled plates and optionally garnish with extra cocoa, chocolate shavings, or a few espresso beans.
Serving idea: Spoonfuls into small glasses and top with berries for individual portions.
Detailed troubleshooting — step-by-step fixes
- Runny cream after folding: Likely underwhipped cream or too-soft mascarpone. Chill the mixture 15 minutes, then gently rewhip a bit or fold in a tablespoon of cold heavy cream whipped to medium peaks.
- Soggy layers: You dipped ladyfingers too long. Next time dip 0.5–1 second per side. To salvage now, chill longer to firm up the cream. Serve with less liquid garnish.
- Bitter coffee flavor: Use slightly less espresso or dilute with a touch of hot water; or add a touch more sugar to the cream to balance.
- Too sweet: Reduce powdered sugar by 1–2 tbsp next time; balance with stronger coffee (less diluted).
Expert Tips for Foolproof Results
- Don’t over-soak: Ladyfingers should be moist, not mushy.
- Use cold tools: Cold bowls help whipping cream stabilize faster.
- Rest overnight: Flavors meld and intensify with time.
- Cut neatly: Dip knife in hot water before slicing.
- Try variations: Add Nutella for chocolate lovers or fruit for a refreshing twist.
Variations of No-Bake Tiramisu
- Berry Tiramisu – Add strawberries or raspberries between layers.
- Chocolate Tiramisu – Mix cocoa into cream for richer flavor.
- Vegan Tiramisu – Use dairy-free mascarpone and coconut cream.
- Kid-Friendly Tiramisu – Skip coffee and use hot chocolate.
- Mini Jar Tiramisu – Perfect for parties and portion control.
Storing and Making Ahead
- Refrigerator: Lasts up to 4 days when covered tightly.
- Freezer: Freeze portions for up to 2 months. Thaw in fridge overnight.
- Transporting: Use a sturdy dish with a lid to keep layers intact.
Health & Nutrition (per serving, approx.)
| Nutrient | Value |
| Calories | 350–400 kcal |
| Protein | 6 g |
| Fat | 20 g |
| Carbs | 38 g |
| Sugar | 18 g |
| Fiber | 2 g |
Final Thoughts
This Easy Tiramisu Recipe – No-Bake Dessert Anyone Can Master proves that elegance doesn’t have to be complicated. With just a handful of ingredients, a little patience, and smart layering, you can create a dessert that delights family and guests alike.
Remember: the secret lies in the balance—coffee-soaked ladyfingers, creamy mascarpone, and that dusting of cocoa perfection. Whether you make it classic, vegan, or fruity, this no-bake masterpiece never fails to impress.
FAQs
What makes this Easy Tiramisu Recipe a no-bake dessert anyone can master?
This recipe avoids complicated techniques like making custard or separating eggs. Instead, it uses whipped cream and mascarpone to create a stable, creamy filling. Ladyfingers are simply dipped in cooled espresso, layered, and chilled—no oven or stove required. This makes it ideal for beginners or anyone who wants a foolproof dessert that delivers restaurant-quality results.
2. Do I need mascarpone for this tiramisu, or can I substitute it?
Mascarpone cheese is the traditional choice for tiramisu because of its rich, velvety texture. However, if it’s unavailable, you can substitute with cream cheese or a blend of cream cheese and heavy cream. The flavor will be slightly tangier, but the dessert will still be delicious and creamy.
3. How long does tiramisu need to chill before serving?
Tiramisu requires at least 4 hours of chilling, but overnight is strongly recommended. Chilling allows the flavors of coffee, mascarpone, and cocoa to meld beautifully while softening the ladyfingers to the perfect texture. Serving too soon may result in layers that feel separate rather than unified.
4. Can I make this Easy Tiramisu Recipe alcohol-free?
Yes! While traditional tiramisu often includes Marsala wine, Kahlúa, or rum, this recipe works perfectly without alcohol. You can replace liqueur with extra vanilla extract or simply skip it altogether. The flavor will still be rich, creamy, and satisfying, making it kid-friendly and suitable for all ages.
5. Why did my tiramisu turn soggy?
The most common reason tiramisu turns soggy is over-soaking the ladyfingers. They should be dipped quickly—about one second per side—in cooled espresso. If soaked too long, they will absorb excess liquid, lose structure, and create a mushy texture. To fix this, chill the dessert longer to allow the cream to firm up.
6. Can I freeze no-bake tiramisu?
Yes, tiramisu can be frozen for up to 2 months. To freeze, assemble the dessert in a freezer-safe dish, cover tightly with plastic wrap and foil, then freeze. Thaw in the refrigerator overnight before serving. The texture may soften slightly but will still be delicious. Freezing individual portions is another great option for quick desserts.
7. What type of coffee is best for tiramisu?
Strongly brewed espresso is the best choice for authentic tiramisu flavor. If you don’t have an espresso machine, you can use very strong brewed coffee or even instant espresso powder dissolved in hot water. For a caffeine-free version, decaf coffee works just as well.
8. Can I prepare tiramisu in advance for a party?
Absolutely! Tiramisu is one of the best make-ahead desserts. Prepare it the day before your event and let it chill overnight. This not only saves you time on the day of your gathering but also ensures the flavors are fully developed. Just dust the cocoa powder right before serving for the freshest presentation.
9. How long does tiramisu last in the refrigerator?
Properly covered, tiramisu lasts 3–4 days in the refrigerator. Keep it tightly wrapped to prevent the cream from absorbing fridge odors. Beyond 4 days, the texture of the cream and ladyfingers begins to deteriorate, so it’s best enjoyed fresh.
10. Can I make tiramisu without eggs?
Yes, this Easy Tiramisu dessert Recipe is naturally egg-free because it uses whipped cream and mascarpone instead of traditional egg yolks and sugar custard. This makes it safer, quicker, and more approachable for beginners while still delivering that signature creamy taste.
11. Can I serve tiramisu in individual cups or jars?
Yes! Serving tiramisu in glass cups, mason jars, or dessert shooters is a popular trend. Simply layer smaller amounts of coffee-soaked ladyfingers and mascarpone cream into each cup, then dust with cocoa. This is a great way to make individual servings for parties and avoids the mess of slicing.
12. How do I get clean slices of tiramisu when serving?
For neat slices, chill the tiramisu overnight so it sets firmly. Before cutting, dip a sharp knife into hot water and wipe it dry. Slice straight down without dragging, then repeat cleaning the knife between each cut. This technique helps achieve clean, bakery-style portions.
13. Can I add flavors or variations to this Easy Tiramisu Recipe?
Yes! Some popular twists include:
- Chocolate tiramisu – mix melted dark chocolate into the mascarpone cream
- Berry tiramisu – add fresh raspberries or strawberries between layers
- Nutella tiramisu – swirl hazelnut spread into the cream
- Vegan tiramisu – use coconut cream and plant-based mascarpone alternatives
14. Is tiramisu safe for kids if it contains coffee?
If you want to make it kid-friendly, simply use decaf coffee or hot chocolate instead of espresso. Skipping alcohol also makes it perfectly suitable for children while still retaining its delicious layered texture.
15. Why does tiramisu taste better the next day?
Tiramisu tastes better after chilling overnight because the coffee, cream, and cocoa flavors blend together, and the ladyfingers soften just enough to create a unified, melt-in-your-mouth dessert. This is why professional chefs always recommend preparing it in advance.